Letters Links to the Letter Sounds

Unlocking Early Literacy: Why Picture-Embedded Visual Phonics Transforms A-Z Alphabet Learning

Mastering the alphabet is the foundational doorway to reading and writing. Yet for many emergent readers, special education students, and children with learning difficulties, connecting abstract letter shapes to their corresponding speech sounds can present a major cognitive hurdle. Pure Joy Teaching’s lowercase A-Z alphabet resources reimagine foundational literacy instruction by fusing visual sound mnemonics directly into letter shapes and linking motor-stroke handwriting to phonemic awareness.

The Power of Picture-Embedded Letters and Lowercase-First Phonics

Traditional alphabet flashcards typically place an illustration next to a letter—such as an apple drawn beside a standalone letter a. For a struggling learner, the brain must perform two separate visual lookups: processing the letter symbol and then looking over to the illustration to recall the sound.

Pure Joy Teaching’s visual phonics approach embeds mnemonic artwork directly inside the letter shape itself. Because the picture forms the body of the letter, grapheme recognition and phoneme recall occur simultaneously:

  • Direct Symbol-Sound Association: The curve of the letter c forms a curled cat, the long stem of h is a tall hose spraying water out the top, the letter o is an octopus, and the letter s twists like a snake.
  • Lowercase Priority Based on 95% Print Frequency: Research in print frequency demonstrates that approximately 95% of written text in books and classroom materials appears in lowercase. By mastering lowercase letter-sound relationships first, young learners gain immediate access to decoding decodable books and building CVC words.

Double-Sided A-Z Alphabet Cards: Connecting Sounds, Shapes, and Color Cues

The A-Z Visual Phonics Alphabet Card set provides a multi-sensory resource that bridges letter identification, phonemic awareness, and proper stroke formation. Printed nine cards per sheet, these double-sided cards give educators a versatile tool for small-group intervention, flashcard drills, flipbooks, or bulletin board sound walls.

To maximize student engagement and independent self-checking, each card features specific visual cues engineered for early learners:

Card ElementVisual FeaturePedagogical Purpose
Front SidePicture-embedded mnemonic artworkEnables instant visual sound recall
Back SidePlain text letter formConnects mnemonic image to standard print recognition
Green DotsFormation starting dotVisual guide to initiate proper letter formation
Red TrimRed border outlineInstantly highlights short vowel sounds
Black TrimBlack border outlineIdentifies consonant sound cards
Red & Black TrimDual border outlineSignals the tricky dual nature of letter y

Complete A-Z Embedded Mnemonic Anchorage

Every lowercase card incorporates a targeted visual anchor designed around short vowel sounds and core consonant phonemes:

  • Short Vowels: a (apple), e (egg), i (igloo), o (octopus), u (underwear).
  • Consonants: b (balloons), c (cat curled in a c-shape), d (duck with a water line), f (flower), g (goat), h (hose spraying high out of the top), j (jelly spilled in a j-shape), k (kite with a tail), l (ladder), m (mountains and monkeys), n (nest with net covering), p (popcorn), q (queen face with crown and tailing hair), r (raindrops with rainbow), s (snake in an s-shape), t (tigers), v (volcano), w (watermelon), x (exercising boy / box), y (yellow yarn), z (zipper).

Handwriting Letter Strips: Grouping Letters by Shape to Stop Reversals

Handwriting instruction often stumbles when letters are taught strictly in alphabetical sequence. Children frequently mix up mirror-image letters like b and d or p and q because their brains have not yet categorized stroke directions into consistent motor patterns.

The Handwriting Letter Strips solve this by organizing the lowercase alphabet into four logical shape families based on how the pencil moves. Every set includes four strips with picture-embedded mnemonics as well as four clean-font strips (in Comic Sans) with starting dots only, allowing students to transition smoothly from visual prompts to independent writing.

The Four Motor-Stroke Letter Families

  1. Curved C-Shaped Letters (c, a, g, d, q, o, s, e):
    • Formation Logic: All letters in this family begin with the curved hook of the letter c.
    • Reversal Prevention: Children learn that letter c turns into a, and pulling the line further down forms g. Because both c and d hook in the exact same direction, students stop confusing d with b.
  2. Dive-Down R-Shaped Letters (r, n, m, h, b, p):
    • Formation Logic: Students start at the top, dive straight down, and bounce back up over the curve.
    • Consistency: Demonstrating that h and b share the exact same starting dive and rightward loop reinforces proper muscle memory.
  3. Straight-Line Letters (l, i, j, t, f, k):
    • Formation Logic: Simple top-to-bottom vertical strokes build writing confidence and hand control.
  4. Slanted Letters (v, w, x, y, z) & Special Vowel Tracing:
    • Formation Logic: Diagonals and zigzag movements are grouped together for smooth motor transition.
    • Memory Clue for Letter U: Students are reminded that the letter u goes under the underwear, preventing them from flipping it upside down and confusing it with the letter n.

Multi-Sensory Learning in Action: The “Sound Out and Erase” Routine

To truly embed grapheme-phoneme connections into long-term memory, literacy instruction must combine visual, auditory, and kinesthetic modalities. The Handwriting Letter Strips support interactive classroom routines that make daily practice engaging and effective.

Interactive Classroom Applications

  • Daily Phonics Warm-Up Flipbooks: Binding the four letter strips into a student flipbook creates a quick 5-minute warm-up before guided reading or phonics lessons.
  • Whiteboard Table Tracing: Students place the strips on dry-erase tables or laminated mats, tracing over the starting dots while voicing the letter sound out loud.
  • The “Sound Out and Erase” Technique: After writing each letter family, students recite the phoneme sound as they erase each letter stroke by stroke, doubling their phonemic practice opportunities.
  • Word Family Extension: The optional back cover includes word list references (CVC and VC patterns) for each shape group, allowing students to transition instantly from individual letter formation to blending full words.

Elevate Your Literacy Instruction with Pure Joy Teaching

Whether used in PreK through 2nd grade classrooms, speech therapy sessions, occupational therapy handwriting interventions, or home practice, Pure Joy Teaching’s A-Z Visual Phonics suite reduces cognitive load and turns foundational reading into an intuitive, multi-sensory success.

By aligning visual mnemonics with motor-stroke letter formation, these resources empower young readers to connect what they see, what they hear, and what they write—building the confidence needed for a lifetime of literacy.

Look on TPT to find the larger collection letter cards and sounds charts.

And the decodable flip book with picture-embedded mnemonics

Bundle of Phonics literacy a-z mnemonics: Bigger Savings


Looking for digraphs; some of them are tricky. Picture-embedded mnemonics can help with that!

Grounded in Science of Reading principles and 95% print frequency research, these tools prioritize lowercase letters and visual-spatial motor patterns. Aligned with Common Core State Standards (including CCSS RF.K.1, RF.K.1a, RF.K.1d, RF.K.3, and RF.K.3b), these resources serve as seamless companions for structured literacy programs such as UFLI, Orton-Gillingham, Occupational Therapy (OT), and Speech Therapy intervention.

Looking for more information about lowercase letters vs. capital letters?

The Hidden Reason Your Child Writes Capital B & D and not Lowercase Letters.

A Mix of Capital and Lowercase Letters in Writing? This Could Be the Reason.

If you have ever looked over a young writer’s shoulder and seen a sentence with a mix of lowercase letters and capitals? Messy letters? Or only capital B’s and D’s, like this: “The Big Dog is in the reD Barn,” you are not alone.

Parents and classroom teachers frequently ask about this puzzling writing habit on social media and in literacy groups.

A child who otherwise understands basic sentence structure will suddenly insert a capital B or a capital D right into the middle or end of a lowercase sentence. It can look like random capitalization, carelessness, or even a sign of dyslexia.

Watch Closely: This May Not Be Random

Firsthand experience in early childhood classrooms and reading intervention reveals a very different story: this is not random, nor is it careless. It is a clever coping strategy. Similar to an “avoidance.” A directional letter avoidance tactic.

Understanding why children develop this coping strategy is the first step toward building true handwriting fluency, eliminating letter reversals, and easing your child’s frustration at the writing table.


1. The Anatomy of the Capital vs. Lowercase

To understand why a child writes “B and D,” we have to look at handwriting from the child’s physical and mental perspective.

When young learners try to form lowercase b and d, they are confronted with two letters that look like mirror images of each other. In traditional handwriting instruction, children are often taught to start both lowercase b and lowercase d with a straight line coming down from the top line.

This top-down starting habit creates an immediate cognitive crisis for the child:

  1. Pencil touches top line: The child draws a straight line down.
  2. Cognitive roadblock: The child pauses in panic.
  3. The direction guess: “Which way does the circle go—left or right?”

Because both letters start with the exact same physical movement, the child has to stop, hesitate, and guess. After making several frustrating mistakes or erasing through the paper, the child discovers a clever shortcut: uppercase B and uppercase D look completely different from one another.

  • Capital B has two bumps on the right and starts with a clear, non-reversible downstroke.
  • Capital D has one large curve on the right and a distinct shape that never gets confused with capital B.

By swapping in B and D, the child bypasses the directionality roadblock entirely. They can keep writing without getting stuck. While this keeps the pencil moving in the short term, it creates significant long-term literacy obstacles.


2. Why the Capital Harms Reading and Writing Fluency

While turning to capital letters seems like a harmless fix, it interferes with critical reading and writing skills in two major ways:

The 95% Frequency Reality Check

In the English language, lowercase letters account for approximately 95% of everything children read and write. Capital letters make up less than 5% of text, reserved primarily for the first word of a sentence and proper nouns. When a child relies on capital B and D as a permanent substitute, they are avoiding practice on the exact letter forms that dominate books, decodable readers, and classroom writing.

Disrupting Decoding and Encoding

Handwriting and reading are twin processes. When children write, they encode speech sounds into physical motor movements. When they read, they decode visual symbols back into speech sounds.

Mixing capitals into words like Big or yarD breaks the visual contour of the word. It slows down reading fluency because the child’s brain must process unexpected capital forms in the middle of lowercase text. Furthermore, it conceals the underlying muscle memory weakness, preventing the child from ever developing automatic lowercase letter formation.


3. Why Teaching Lowercase b and d Together Backfires

Many traditional alphabet charts and handwriting workbooks introduce b and d side-by-side or teach them in alphabetical order (Aa, Bb, Cc, Dd). Some programs even encourage children to memorize visual tricks, such as forming “bed” with their fists or remembering that “b has a belly and d has a backpack.”

While well-intentioned, side-by-side comparisons often worsen visual and motor confusion for struggling learners:

  • High Cognitive Load: Presenting two reversible shapes together forces the child’s working memory to evaluate both options simultaneously every time they write.
  • Competing Motor Movements: When b and d are taught together, the brain groups them into the same mental folder, reinforcing their association rather than separating them.

To fix reversals permanently, lowercase b and lowercase d, can be separated completely into two distinct movement families based on where the pencil starts.


4. The Movement-Based Solution: Separating b and d into Letter Families

Instead of grouping letters alphabetically or by visual appearance, structured motor-movement instruction organizes lowercase letters by shared starting points and stroke patterns.

When lowercase b and lowercase d are placed into completely different movement families, the directional confusion vanishes because the pencil starts in two entirely different places.

Letter FamilyLowercase Letter GroupStarting Point VisualFirst Motor Movement Sequence
R-Shaped Dive-Down Groupb (r, n, m, h, b, p)Golden coin at the top lineDive straight down, slide back up, hook to the right
C-Shaped Curved Groupd (c, a, g, d, q, o, s, e)Golden coin at upper-rightCurve back around to the left (make a c first)

Lowercase b Belongs to the R-Shaped Dive-Down Family

Lowercase b is part of the R-shaped dive-down letter family (r, n, m, h, b, p). All six of these letters share the exact same foundational movement pattern:

  1. Start at the top (marked by a visual starting dot, like a golden pirate coin).
  2. Dive straight down.
  3. Slide back up the same line.
  4. Hook over to the right.

In this sequence, b is introduced right after tall letter h. The child already knows how to make h by diving down tall, sliding up, and hooking to the right. To make b, they simply complete the hook by closing the bottom curve to the right. Because every letter in this family moves continuously to the right—matching the natural direction of English reading and writing—the child never has to guess which way the loop turns. Visual cues in the sand, such as seaweed patterns, reinforce this left-to-right flow.

Lowercase d Belongs to the C-Shaped Curved Family

Lowercase d does not start at the top line with a straight downstroke at all! Instead, it belongs to the C-shaped curved letter family (c, a, g, d, q, o, s, e).

Every letter in this family begins with the familiar c-curve stroke:

  1. Start over to the right (just below the midline).
  2. Curve back around to the left to make a c shape.
  3. Travel all the way up tall to complete the d.
  4. Slide straight back down to the baseline.

Because lowercase d begins with a c shape (illustrated in storybooks as tracing around a curved half-coconut in the sand), a child who can form the letter c can immediately form a d without ever confusing it with b. The starting movement for d goes to the left, while the starting movement for b goes straight down and hooks to the right.


5. Practical Steps for Parents and Teachers

If your child or student is currently writing “They are Both Big Dog in the yarD,” here is a step-by-step plan to retire the capital letter crutch and build confident lowercase handwriting:

1. Watch the Starting Point (The Pencil-Touch Diagnostic)

Don’t just look at the finished word on the page. Watch where your child’s pencil touches the paper first when writing a d:

  • If the pencil touches down at the top line to draw a stick first, stop them gently. They are using the b starting movement for a d.
  • Prompt them: “Start over here to the right, make a ‘c’ first, go up tall, and bring it down.”

2. Use Tactile and Multisensory Tracing

Before asking children to write sentences on paper, build physical muscle memory through sensory tracing:

  • Sand Trays: Have children trace letter strokes in a shallow tray of sand or salt. Tracing the C-shape for d and the dive-down stroke for b in sand engages tactile brain pathways and locks in stroke direction.
  • Letter Strips with Starting Dots: Place visual letter strips on the desk that clearly display a green starting dot at the top of b and at the upper-right starting curve of d.

3. Anchor Formation Through Visual Storytelling

Children remember movements best when anchored by memorable stories and visual clues.

  • In R’s Pirate Letters, children follow pirates tracing r-shaped seaweed in the sand, discovering how tall letter h naturally closes at the bottom to become b.
  • In C Pirate Letters, pirates trace curved coconuts in the sand, discovering how the c shape forms the foundation for a, g, and d.

Summary Checklist for Fixing B/D Confusion

Traditional Approach (Fosters Reversals)Movement-Based Approach (Prevents Reversals)
Teaches b and d together side-by-sideSeparates b into R-family and d into C-family
Starts both letters with a straight line downStarts b at the top line; starts d with a c curve
Relies on visual memory tricks (“belly vs. backpack”)Relies on tactile stroke direction and muscle memory
Allows capital B and D as a temporary crutchReplaces the crutch with clear lowercase starting dots

By shifting from alphabetical order to movement-based letter families, you eliminate the cognitive friction that causes children to write capitial letters in place of lowercase letters.

Pure Joy Teaching has designed resoures to the help teach and pratice this foundational skill. With clear starting dots, and visual story anchors, young writers can trade in their capital letter habit for fluent, automatic lowercase handwriting.

Resources with the pirate theme

Resources with picture-embedded sound visuals

You can get full handwriting storybook on Amazon

Looking for just b & d?

Pure Joy Teaching
Pure Joy Teaching

Sources: for 95% lowercase letters

Easy Interactive Phonics Worksheets (UFLI Lessons 1-34)

Beyond Busywork: The Cognitive Science Behind Interactive Phonics Worksheets (UFLI Lessons 1-34)

Interactive notebooks are a great way to engage students in a lesson. However, the need to balance the busywork of cutting, coloring, and the overflow of endless paper scraps is an unwanted side effect.

Especially for younger students who are still learning how to hold the scissors. The idea of less cutting and more folding became an idea that bloomed into a worksheet with less paper waste on the floor.

1. The Folding-Flap Mechanic: Tightly Looping Decoding and Encoding

3-Way Folding Flaps: Realizing the Reciprocal Loop of Reading and Spelling

For decades, decoding (reading) and encoding (spelling) were treated as separate subjects. Cognitive science has since proven that they are actually two reciprocal sides of the alphabetic principle. Reading is decoding sounds from print, while spelling is encoding sounds into print.

On our worksheets, students don’t just point to letters—they physically build them. By utilizing independent paper flaps for the initial, medial, and final positions, students manipulate spelling patterns step-by-step:

Complete, Paper-based Word-Chaining Tile Board

  • The Encoding Step: When a child physically folds down a flap to change a letter (e.g., folding r over s to change sun to run, or folding b over n to change run to rub), they are actively translating spoken phonemes into written graphemes.
  • The Decoding Step: Once the new word is formed under the flaps, the student looks at the visual representation to blend and read the word aloud (run > /r/ – /ŭ/ – /n/).
  • The Orthographic Map: By immediately writing the word they just manipulated and read on their response sheet, students seal the sound-symbol connection. This rapid loop of building, reading, and writing bonds the visual letter representations directly to their pronunciation and meaning in memory—the exact definition of orthographic mapping.

2. Mastering Phoneme Substitution (Step 6 Word Work)

Many basic “word family” worksheets restrict students to simple onset-rime matching (e.g., only changing the first letter, like s-un to r-un). While onset-rime is a helpful intermediate step, true word reading proficiency requires a student to manipulate sounds in all word positions.

Our worksheets feature three to six moving flaps, allowing changes in all three phoneme slots. This allows students to progress systematically through a complete, multi-step word chain (e.g., sun > run > rub > tub > tab.

  • Initial Change (Onset): sun> run
  • Final Change (Coda): run > rub
  • Medial Change (Vowel): tub > tab

This matches the exact, research-backed instructional routine found in UFLI Step 6 (Word Work). Practicing phoneme substitution in all three positions trains the brain to recognize that a change in any part of a word completely shifts its identity, forcing students to scan words from left to right rather than guessing.


3. Drastically Lowering Cognitive Load for Struggling Learners

Segmenting a word sound-by-sound, holding those isolated sounds in mind, and then blending them back together places a massive demand on a child’s working memory. If a student has a slow processing speed or a Rapid Automatized Naming (RAN) deficit, retrieving the sound for each letter takes too long, causing the phonetic sequence to collapse in their memory before they can blend it.

Word chaining is a cognitive scaffolding tool designed to solve this exact problem:

  • By systematically changing only one letter at a time (e.g., changing rub to tub), two-thirds of the word remains visually stable on the page.
  • This reduces the working memory demand by 66% because the student only has to process the single sound that has changed.
  • By preventing cognitive overload, we keep struggling readers and dyslexic learners—who often require 20 or more exposures to map a word—from feeling overwhelmed, replacing anxiety with an encouraging “can-do” momentum.

4. Engaging the Tri-Sensory Brain Pathways

The neurological process of reading requires the visual, auditory, and motor regions of the brain to operate as an integrated system. Our interactive worksheets are designed as complete tri-sensory experiences to speed up memory acquisition:

  1. Visual (Eye): Students view the printed graphemes, match words to meaning, and observe the explicit mouth articulation models to see how their lips and tongue should form to produce the sound.
  2. Auditory (Ear): Students segment sounds, blend the word chains aloud, and say the letter sounds aloud as they write them.
  3. Kinesthetic (Hand): Students physically fold the paper flaps, touch and hunt for letters, and write the words by hand. Kinesthetic memory is the earliest, strongest, and most reliable memory channel we have.

By actively triggering all three pathways simultaneously, we establish multiple retrieval paths in the brain, helping students anchor abstract letter shapes to permanent memory.


5. Handwriting Automaticity as a Cognitive Liberator

Many teachers ask why correct letter formation and handwriting blocks are built directly into our phonics sheets rather than being kept as a separate activity.

The cognitive science of writing reveals that if a child has to exert conscious mental energy trying to remember how to physically draw the letter b (e.g., “Do I start at the top? Does the bubble go to the left or the right?”), their brain has less processing power available to focus on spelling, syntax, or comprehension.

By explicitly practicing the motor plan for correct handwriting strokes alongside the corresponding sound-symbol connection, we build automatic muscle memory. Once handwriting becomes automatic and requires little conscious control, the student’s cognitive energy is completely liberated to focus on higher-level reading and writing.


Swap the Loose Tiles, Keep the Science

We designed these interactive worksheets to give teachers a zero-prep, paper-based alternative to loose letter tiles without compromising on the speech-to-print science that drives UFLI and Orton-Gillingham instruction. By making phonics a physical, manageable, and highly successful daily activity, you can help your Kindergarten students slay the “guessing monster” once and for all.

UFLI Notebook For Decodables

UFLI Foundations is a wonderful program. We used it for reading intervention and ESL. For the younger students, we folded the page in half and glued the decodables into the notebooks so they could read, re-read, and interact with the page.

This gave us extra space to write on and adapted a few techniques for the students that needed extra support and practice.

1. Comprehension = Who & What

The goal of reading intervention is for the student to learn to read. However, the testing was showing the students had little or no comprehension and could not advance to the next level. So, we adapted a few things. Before the student could illustrate the story, they needed to list the who and the what topics in the story.

For this story, the who was Dad, Kip, and the pup. The what was the disk, mud, and the tub. After the student has read the story, they need to write the keyword on the line. Then they can draw what was in the story.

We needed to make these changes because some students wanted to draw rainbows and princesses for every story. Labeling first gave us a chance to write the words that were in the story and reflect on who and what the story was about.

2. Print Awareness Drop Down Letters

Some students struggle with tall, small, and fall letters.

Some of the students struggle to see the visual difference between d, b, & p. This print awareness skill is more than just randomly circling the letter p like a Savonjour hunt. This technique teaches the student to start at the beginning of the sentence and trace under the letters to find the letter that drops below the line. Then loop around to circle them without lifting the pencil. This is called eye-tracking. The student is visually scanning the text line the same way they would read it. This builds the left-to-right habit that is needed for decoding and encoding.

The continuous line mimics how the finger would follow under the words as the student reads and how eye tracking should follow the letters and not jump around on the page.

For this lesson #22, letter K was our focus letter, but not the letter used for the print awareness drill. Lowercase letter /p/ was the letter that the students needed to practice based on the struggles they had with reading and decoding. Teaching is flexible practice. Small adjustments can be made tailored to the students’ needs in the moment.

Fold the Page & Glue Only Half Down

Notebooks start to get full quickly. The printed decodable stories are great for reading and more. Folding the page before it is added to the notebook helps save space for more writing.

Folding creates space on the page and on the back of the folded area as well.

This routine of folding the page saved us a lot of space in our notebooks. Instead of using two pages for every lesson, we were able to use only one page per lesson.

Under this flap can be spelling words, sentences, irregular words or handwriting practice.

Get the UFLI decodable for the Toolbox. From the Resources Menu

Or the Printable Resources – for compiled lessons & Supplemental Decodable Passages

More About Organizing UFLI Supplies

Links to TPT printables for UFLI-inspired resources

Follow Me on Facebook, YouTube & TPT 🤩

Best Handwriting Picture Book Series

Four Pirate Adventures. Four Visual Handwriting Discoveries.

Discover a different way to learn lowercase letter formation.

Join the pirates as they explore their island and uncover the shapes hidden within lowercase letters.

From seaweed and coconuts to turtle tracks and shark teeth, each adventure uses imaginative visual clues to help children recognise letter patterns, understand starting points and become familiar with the movements used to form letters.

Kids can learn letter formation visually from a storybook

These story-based picture books help children learn how to form lowercase letters the right way—through engaging characters and visual storytelling, not repetitive worksheets. Young learners can visually see the similarities in the letters. Each book guides young learners step-by-step, showing how letters are shaped and why, so children naturally understand proper formation as part of the story.

Designed for preschool and early primary years, this series builds strong handwriting foundations while keeping learning enjoyable and meaningful. It’s a gentle, effective way to support early writing skills—perfect for parents, teachers, and anyone looking to help children develop confident, correct handwriting from the very beginning.

Why Visual Letter Grouping Makes a Difference

Grouping letters by similar shapes helps children build both muscle memory and visual recognition more effectively. When letters are introduced in carefully chosen groups, learners begin to notice patterns in how letters are formed, making it easier to remember and reproduce them correctly. This structured approach supports consistent, confident handwriting from the very beginning.

By practising letters with related shapes, children strengthen fine motor skills through repeated, meaningful movements rather than isolated drills. Over time, this reduces common issues like letter reversals and confusion, as children develop a clear and reliable understanding of how each lowercase letter is formed.

The Four-Book Set is available together in one complete book

On amazon

More Than Handwriting Practice – A Visual Journey of Discovery

The Pirate Handwriting collection brings together four imaginative stories, each introducing a different group of lowercase letters through visual storytelling.

Instead of presenting letters in alphabetical order, the books explore related letter shapes and formation patterns.

Children discover:

  • Letter relationships: Recognising familiar shapes within different lowercase letters.
  • Starting positions: Using visual clues to understand where letter formation begins.
  • Letter size: Noticing the differences between short, tall and drop-down letters.
  • Formation movements: Building familiarity and muscle memory through related letter patterns.
  • Vowel awareness: Following the colourful bird’s discoveries throughout the four adventures.

Two Kinds of Treasure

The pirates begin by searching for treasure, but their adventures lead them to two important discoveries.

First, they uncover the visual patterns that help them understand lowercase letter formation.

Then, with the help of a colourful bird, they discover the vowels and why these special letters are needed for reading and spelling words.

Four books bring these discoveries together in one continuing adventure.

A playful story. A visual discovery. A meaningful approach to learning handwriting.

Display cards, posters, and worksheets support the picture books

Letter g, Mastering Sound and Shape

lowercase letter ‘g’ can be a tricky one to learn, both in terms of its sound and its shape. While these challenges are quite common, understanding the reasons behind them can help students overcome confusion. They can master the letter with ease with these helpful tips. Let’s break down two main difficulties students often face when learning the lowercase ‘g’.

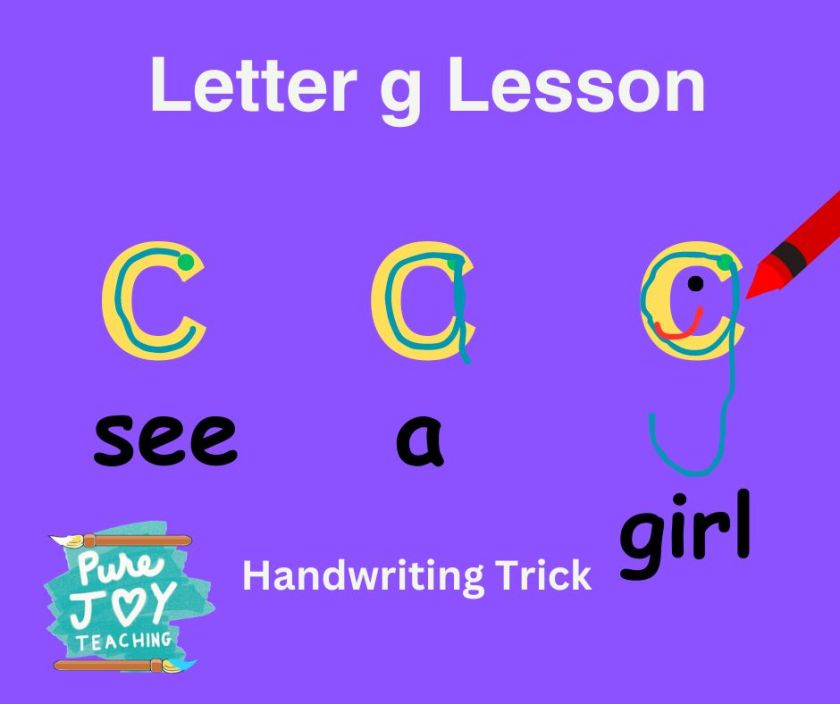
Clever handwriting trick for making the letter and the hard g sound.

Watch this super simple video a few times. Learn to make the lowercase letter g in three easy steps and remember the hard /g/ sound with the word “girl.”

See /c/, /a/, /g/ girl. YouTube Video Here.

Pure Joy Teaching. Handwriting Trick for the Letter /g/.

This video was made at the request of a mother who was trying to teach her daughter to make the lowercase /g/ correctly and remember the letter sound, too.

Understanding the Lowercase Letter ‘g’: Overcoming Common Struggles

For many students, the lowercase letter ‘g’ can be a tricky one to learn, both in terms of its sound and its shape. While these challenges are quite common, understanding the reasons behind them can help students overcome confusion. They can master the letter with ease with these helpful tips. Let’s break down two main difficulties students often face when learning the lowercase ‘g’.

1. Letter Sound Confusion: The Soft ‘g’ and the “j” Sound

One of the biggest challenges students encounter is distinguishing the sound of the letter ‘g.’ When we say the name of the letter “G,” it sounds like the “j” in words like “giraffe.” This can lead to confusion because the letter ‘g’ actually has two distinct sounds in English:

  • The hard ‘g’ sound, as in “go” or “girl.”
  • The soft ‘g’ sound, as in “giant” or “giraffe.”

Because the letter name sounds like a soft “j,” students can mistakenly believe that the letter always makes the soft sound. Helping students practice both the hard and soft sounds of ‘g’ can clear up this confusion.

2. The Shape of Lowercase ‘g’: Confusion with Capital G

Another challenge is the shape of the lowercase ‘g,’ which can easily be confused with the capital letter ‘G.’ The lowercase ‘g’ is unique because it has a loop at the bottom that faces the opposite direction of the capital ‘G.’ This can be difficult for students to grasp, especially since both letters look somewhat similar. If they have learned the capital letter first, they may influenced by that initial shape curving the other direction.

To help students remember the lowercase ‘g’ shape, it’s important to practice writing the letter step by step:

  • Start by drawing the letter /c/.
  • Then, make it into the letter /a/ by sliding up and down to the line.
  • Finally, complete the letter by drawing a little tail that hangs out to the left side. Very simular to the letter /j/ tail.

By focusing on these specific steps and practicing the direction of the curve, students can avoid mixing up the lowercase ‘g’ with its capital counterpart.

The Importance of the Starting Point

The lowercase letters c, a, and g, all have the same starting points. Unlike most lowercase letters the /c/ shaped letters move in the opposite direction of normal English reading. The /c/ shaped letters start at the top and move from right to left. This book is helpful for teaching these letters.

Tips for Teaching the Lowercase ‘g’

  1. Use Visual and Auditory Cues: To reinforce both the sound and shape of ‘g,’ this video can be a helpful tool.
  2. Practice Writing: Give students plenty of opportunities to write lowercase ‘g’ repeatedly, encouraging them to focus on the starting point of the letter /c/. and the direction of the curve. It can also be helpful to trace the letter first, then try writing it independently.
  3. Focus on the Sound: Practice distinguishing between the hard and soft ‘g’ sounds in various words. Reading aloud and singing songs with the letter ‘g’ can help students become more familiar with the sound.

Conclusion

While the lowercase ‘g’ may seem tricky at first, understanding the reasons behind the confusion can help students master both the sound and shape of the letter. By practicing consistently and breaking down the challenges step by step, students can overcome their struggles and gain confidence in their learning journey. With patience and the right approach, the lowercase ‘g’ will become second nature!

Pure Joy Teaching

Handwriting Video Letter Group C

C-Shaped Letter Group

The C-Shaped Letters are c, a, g, d, q, o, s, e

The Importance of Correct Letter Formation: How Understanding the “C” Shape Can Help With Writing Letters Like lowercase a, g, d, q, o, and s

Learning to write is one of the most foundational skills children acquire, and proper letter formation is a key component in developing legible handwriting and decoding text. One effective way to teach this is by focusing on the shared shapes and movements that many letters have in common. This is especially true when it comes to the “C-shaped” letters—c, a, g, d, q, o, and s. These letters all begin with the same basic motion, which makes mastering their formation easier and more intuitive.

Letter is e, is also included in this group because it shares the same “c” shape curve. The lowercase letter /e/ has a rare starting place in the center of the letter between the lines.

Why Focusing on the “C” Shape is Helpful

The concept of the “C-shape” refers to the curved stroke that forms the initial part of several letters. By recognizing that many letters share this common starting point, children can develop muscle memory that will help them write these letters more fluently and correctly. Here’s why it’s so beneficial:

  1. Consistency in Movement: All the “C-shaped” letters—c, a, g, d, q, o, and s—start with a curved stroke. This consistent motion reduces confusion for young learners who might otherwise feel overwhelmed by the differences between each letter. Once they master the curve, they can apply it to multiple letters.
  2. Building Confidence: When children see that many letters share a similar starting stroke, they gain confidence. Instead of learning each letter individually from scratch, they understand that a large portion of their task is already the same. This helps reinforce a sense of achievement early on.
  3. Muscle Memory: Proper formation of each letter is essential for developing legible handwriting. Starting with a consistent motion that works for several letters helps the child develop the fine motor skills needed to form these letters efficiently. Repeated practice of the “C” shape strengthens hand-eye coordination and improves control over the writing utensil.
  4. Improved Readability: Correct letter formation leads to more legible writing. When children are taught to form letters like – a, g, d, q, o, and s with the same initial stroke, their writing becomes smoother and more consistent. The clear structure of each letter helps others easily read and understand their work.

The Key Letters That Share the “C” Shape

Here’s a breakdown of how these letters are formed and why their shared beginning is so useful:

  • c: The letter C begins with a simple, open curve that gently curls from top to bottom. It’s the perfect starting point for understanding how a curved stroke can be controlled.
  • a: Starting at the top with a curved stroke similar to the C, A then forms a pointed peak. This shared beginning helps learners transition from the open curve of C to the pointed structure of A.
  • g: The letter G shares a similar shape to C but adds a small horizontal line at the bottom. Understanding how the curve connects to the baseline in C helps learners add the horizontal stroke to form G.
  • d: Beginning like c, the letter d, incorporates a straight line down the right side to complete its form. The curved stroke serves as the foundation for creating the full d shape.
  • q: The letter q begins like the letter c, then drops down with a straight line to create a hanging letter.
  • o: O mirrors the C in terms of its curved stroke, but it forms a complete circle. Once children can form the C shape, drawing O becomes a natural next step. They should start the letters in the same spot to the right. Not in the center.
  • s: The letter S starts with a small C-like curve that loops back on itself. This shape may appear complex, but it becomes easier once learners understand how to curve the stroke in a continuous motion. Remind students that letter /s/ starts with a small /c/ shape then turns and flips into a backward /c/ shape.

How a Video Can Support Learning

Using a video to demonstrate how to form these “C-shaped” letters is an excellent way to reinforce proper letter formation. Visual learners can benefit from seeing the motion in real time, as it helps them better understand how to make the connections between each letter. A video can also provide:

  • Slow-motion tutorials to break down the steps for each letter.
  • Interactive feedback to encourage learners to try forming the letters themselves. Using whiteboards, paper, sand, or air writing.
  • Multiple examples to ensure mastery of the technique.
Pure Joy Teaching the C-shaped letters

Conclusion

Focusing on the common “C-shape” in letters like -c, a, g, d, q, o, s, and e, offers a practical and effective way to teach children proper letter formation. By highlighting the shared motion and stroke, children can build confidence, improve their handwriting skills, and progress through these letters more smoothly. Using video resources to reinforce these concepts can further enhance learning, providing visual cues and demonstrations that support the development of good handwriting habits.

For C-shaped resources see my book,

Learning to form letters can be easy and fun. Start with a few at a time, within the letter groups and mastery should come with practice.

See the whole collection: r-shaped letters, straight line letters, slant line letters.

Have Pure Joy Teaching

pure joy teaching

Tic Tac Toe Board with Electrical Tape

Students like to play this game. I choose skills or words that they need to practice. Great for handwriting practice, cvc words, sight words, or tricky vowel sounds.

Create a reusable whiteboard to practice handwriting and spelling.

Tic-Tac-Toe was one of the first games I learned to use as a tool, to help teach my preschool students. Simple x’s & o’s, and the spatial awareness of drawing the lines. The kids think of it as a game and are more willing to pick up a pencil or crayon if it feels fun.

White Board with Tape Lines.

Using electrical tape has created something reusable. I was surprised at how much the kids loved erasing the words, and the lines stayed. It was like magic to them. They wipe the letters off and rush to play again. Hooray!

Adding the lines has given new life to this old scratched-up whiteboard.

Cutting the Tape

The original thickness of the electrical tape is wide. Making the lines thinner, by cutting with scissors was too hard. Using an Xacto made it easier to cut.

Carefully cut away from yourself.

Cutting a straight line without a guide was too hard. Don’t try it! I found a plastic milk cap that was a nice thickness. With the electrical tape flat on the table, I could keep the Xacto knife flat on the cap. Rotate the tape slowly and cut the tape with a little bit of pressure to cut the tape. Be sure to cut away from your body.

Pure Joy Teaching

Try CVC words.

CVC words are great for this game. After we play the Uno CVC game, I will choose some words they need to practice writing.

Using the tic-tac-toe game is great for practicing sight words. Try capital letters and lowercase letters. Especially in words like the letter /i/ (It, If, Is, In) Those are good words to work on. Remind the students to sound out the word as they write it.

Sometimes we practice just the letters b, and d. This helps with letter reversals.

Have Pure Joy Teaching

https://www.teacherspayteachers.com/Sellers-Im-Following/Add/Pure-Joy-Teaching

C Pirate Letters Sand Tray

Correct formation of the letter e is very important. This has been helpful for many students. Letter e is the only letter that starts in the middle.

Montessori-Style Letters with an Engaging Pirate Theme

Handwriting can be an engaging activity with a pirate theme in a sand tray. In book two of this handwriting letter adventure, the pirates have just realized that they have no vowels. All the letters that they learned in book one can not be used to spell any real words. Their excitement turns to confusion.

A cheeky bird calls out, “Aw, au vowels.” Then it flies away.

The pirates rapidly chase after the bird and learn to make the C-shaped letters along the way. This group includes c, a, g, d, q, o, s, e.

Sand Trays

The use of sand trays in the Montessori style is one of my favorite ways to practice letters. Normally, I just would rotate different colors of sand, or customize the tray bottom with different colored or shiny paper. But this storybook pirate theme opens up my options and lets me add items from the book. The kids can recreate the letters by following along or re-enacting the story. This gives me more opportunities to talk to them about starting spots and correct letter formation in a fun way.

Choosing the right supplies to make a mini fake coconut for the C-letter theme.

Gathing Supplies for the C-Letters to Trace Around

Any box will do to make your own sand tray. It can be a fancy wood one like this, or a shallow box with a lid if you are concerned with spills. The fake coconut may be harder to find. My husband brought me a macadamia nut still in the shell. I think is the perfect size. I need to cut it and paint the inside white. The larger object next to it was an avocado seed, but the shape it off. I don’t think I will use that one.

Yellow paint on the coin gave it extra shine.

Pirate gold at the top marks the start spot for most of the letters in the group. I had a foreign coin that was about the size of a penny, with some extra yellow paint added, it now stands out from the sand color. This was the best size for my small box. If your box is bigger, you could use the fake gold they sell in the party supply stores.

The Letter e, Starts in the Middle

You might want to have one fake coconut that is still whole and roll it in your sand tray for the letter e. In the story, the pirates hear a weird noise in the brushes and one of them rolls a coconut like a bowling ball in a straight line. Then, the monkey pushes it away and it makes the letter e shape.

When I teach this to students at my writing table, I open the book and show them the pictures. We say the steps together roll it straight and the monkey pushes it around in the c shape. That is the letter e. This has been helpful for many students. Letter e is the only letter that starts in the middle.

Correct formation of the letter e is very important. Many students make sloppy rushed letters. In the case of letter e, it might look the same as the letter c. This is a problem that impacts spelling especially if the /e/ is close to the letter /k/. Then the word looks like it ends with /ck/.

You can order the books from Amazon and the letterstrips, letter cards and worksheets can all be found on TPT.

The adventure continues, the pirates think that someone has been digging for treasure on the island. A huge surprise in the sand leads them to learn the next set of straight-line letters.

These letters are the third handwriting group they learn: i, j, l, t, f, k.

The straight lines of the turtle tracks leading to the water are a very good way to explain the direction of travel and remember to start at the top. The hatchling eggs mark the dot on top of the letters i and j.

Pirate theme handwriting letters

Book 3 of the handwriting adventure.

The pirate’s journey is complete and they find the last vowel and the treasure in book four X Pirate Letters. Shark teeth are used to make the pointy slanted line letters.

The whole pirate adventure is available in one storybook on Amazon. The Pirate Letters: Lowercase Handwriting Storybook.

Have Pure Joy Teaching

The b fits in the Left Hand

This is a helpful way to remember which way the letter b is going

b/d Reversals Tricks and Tips

b d reversals. Do your students ask this question a lot? Which way is b?

This poster is a helpful way to remember which way the letter b is going. It should fit in your left hand. Find it here on TPT.

This works for students who are right-handed writers.

Pure Joy Teaching

You might also like this hb hb go the same way. Great for letter b reversals.